Sometimes, cracks occur on the surface of or inside structures and industrial products due to deterioration. In the case of aircraft and power plants, there is a possibility that these cracks could lead to a huge accident, so generally there are periodical checks of internal structures using non-destructive testing, which allows investigation without damaging the object in question. Ultrasonic inspection method is widely used for this testing; this method estimates complex inner structures from scattered waves that disperse in various directions from an originating point - for example, the edge of a defect - but until now there was no method to investigate 3D scattering phenomena.
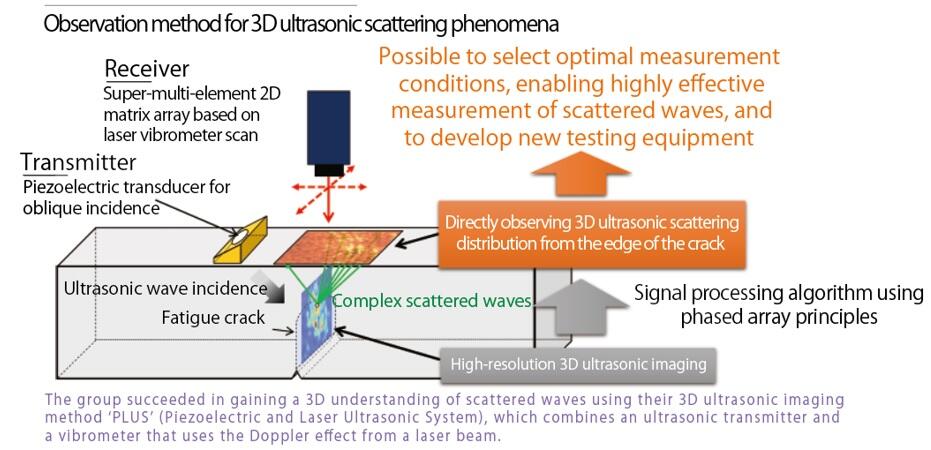
A research group consisting of Associate Professor Yoshikazu Ohara of the Graduate School of Engineering, Tohoku University and his colleagues have developed a method for observing 3D ultrasonic scattering phenomena based on their 3D ultrasonic imaging technique 'PLUS', which combines 2D scanning by a laser Doppler vibrometer (that can measure vibration information without contact from local areas on which the laser is irradiated) and a piezoelectric transducer.
Through their research, the group succeeded in directly observing how scattered waves originating from cracks are distributed by resolving a fatigue crack into microscopic scattering sources and creating a signal processing algorithm using information concerning propagation time to a receiving point.
This has scientifically optimized testing standards and accuracy that previously relied on the experience of experts, and enabled the development of new ultrasonic testing equipment with effective measuring capabilities. By increasing the accuracy of defect measurement, the group aims to realize a sustainable society with safety and peace of mind in a wide range of fields - not just aircraft and power plants, but also automobiles, bridges, tunnels and expressways.


